聚类压缩
聚类压缩旨在提高搜索性能,降低大型 Collection 的成本。本指南将帮助您了解聚类压缩以及该功能如何提高搜索性能。
概述
Milvus 将输入的实体存储在 Collection 中的分段中,并在分段已满时将其封存。如果出现这种情况,就会创建一个新的段来容纳更多的实体。因此,实体会任意地分布在不同的段中。这种分布要求 Milvus 搜索多个分段,以找到与给定查询向量最近的邻居。
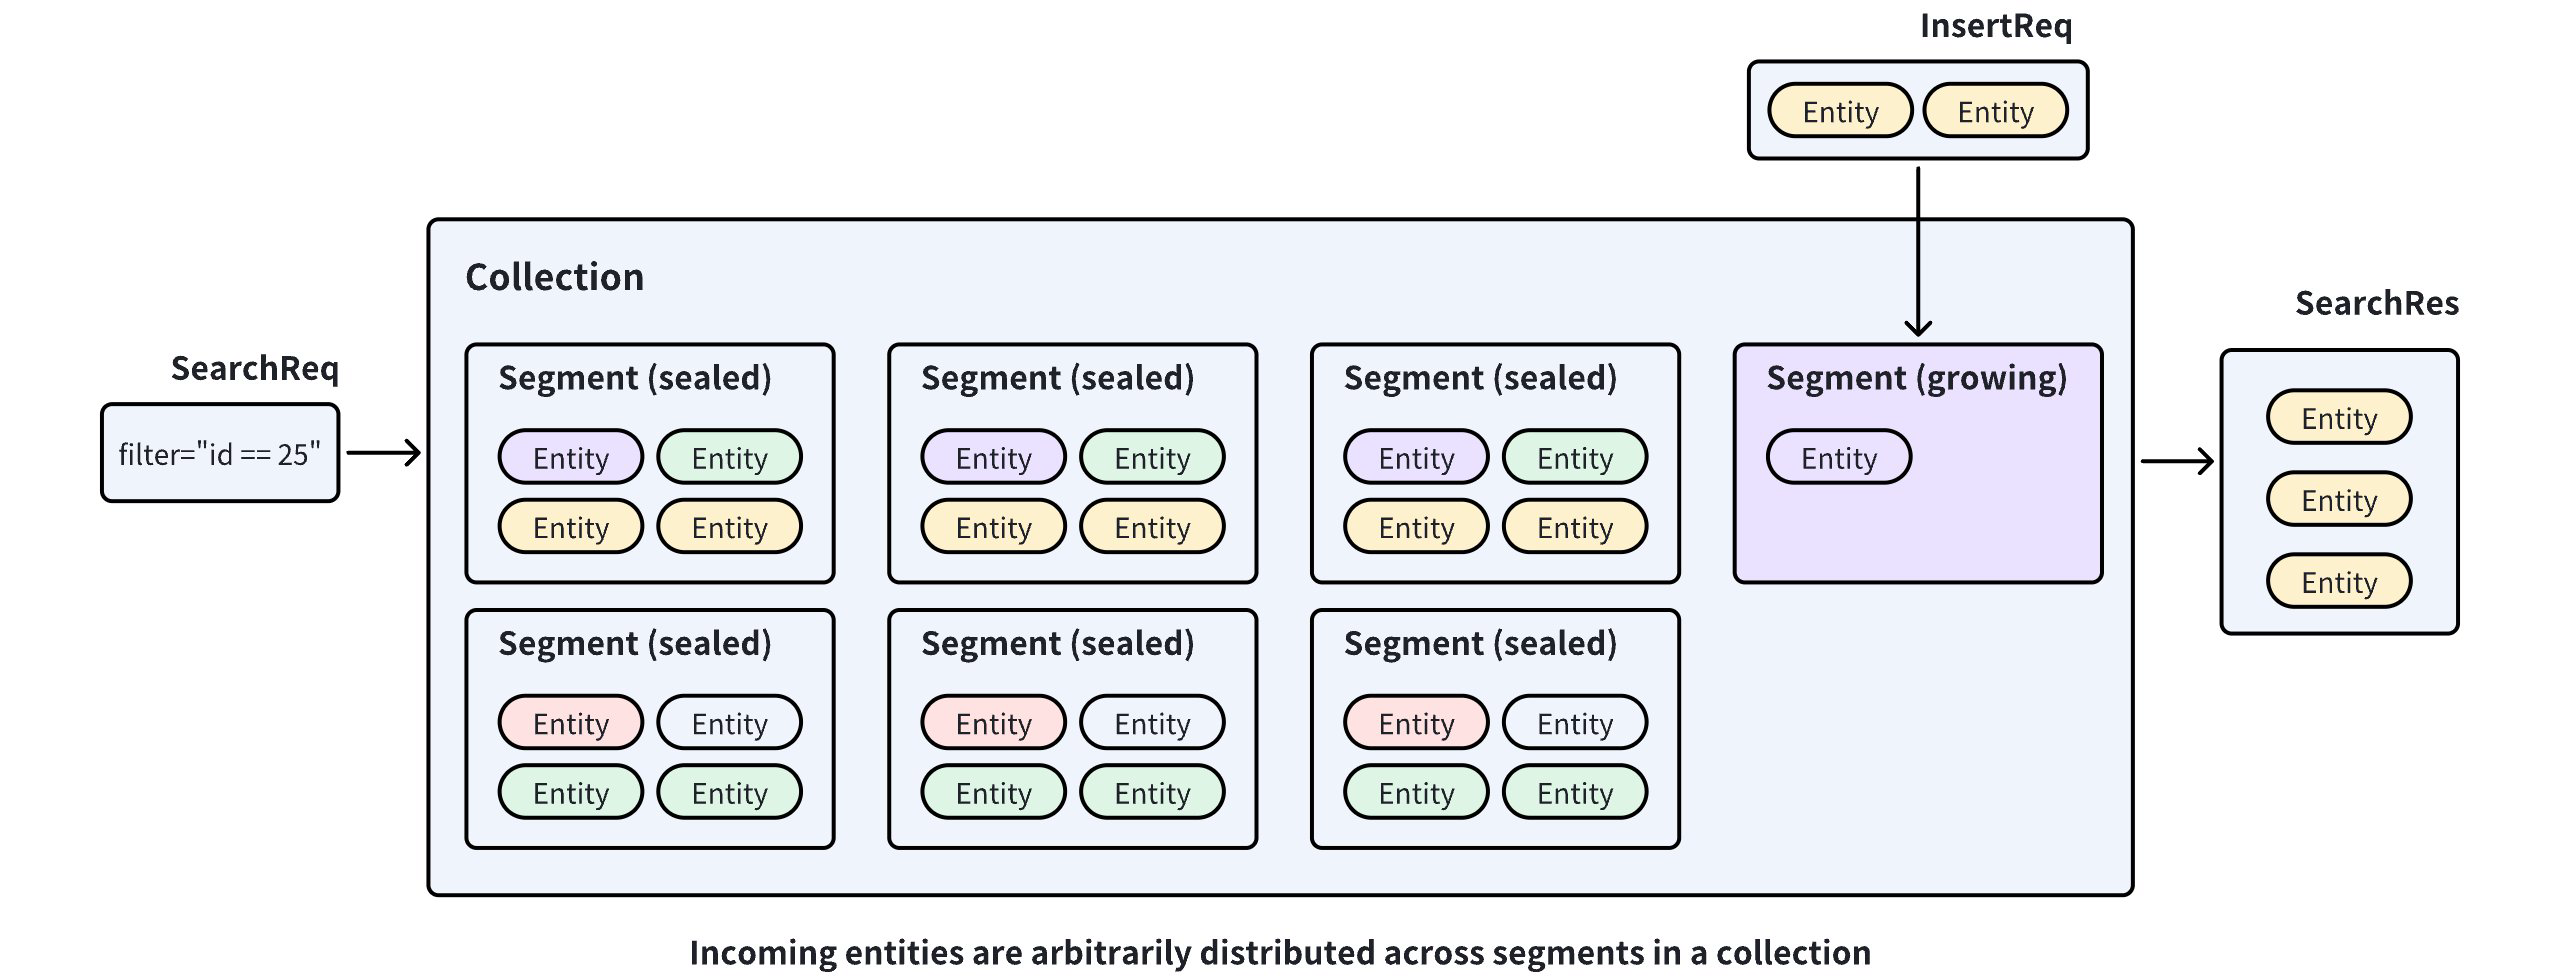 无聚类压缩
无聚类压缩
如果 Milvus 可以根据特定字段中的值将实体分布在不同的段中,那么搜索范围就可以限制在一个段内,从而提高搜索性能。
聚类压缩(Clustering Compaction)是 Milvus 的一项功能,它能根据标量字段中的值在 Collection 中的段之间重新分配实体。要启用此功能,首先需要选择一个标量字段作为聚类键。这样,当实体的聚类键值在特定范围内时,Milvus 就能将实体重新分配到段中。当你触发聚类压缩时,Milvus 会生成/更新一个名为PartitionStats 的全局索引,它记录了段和聚类键值之间的映射关系。
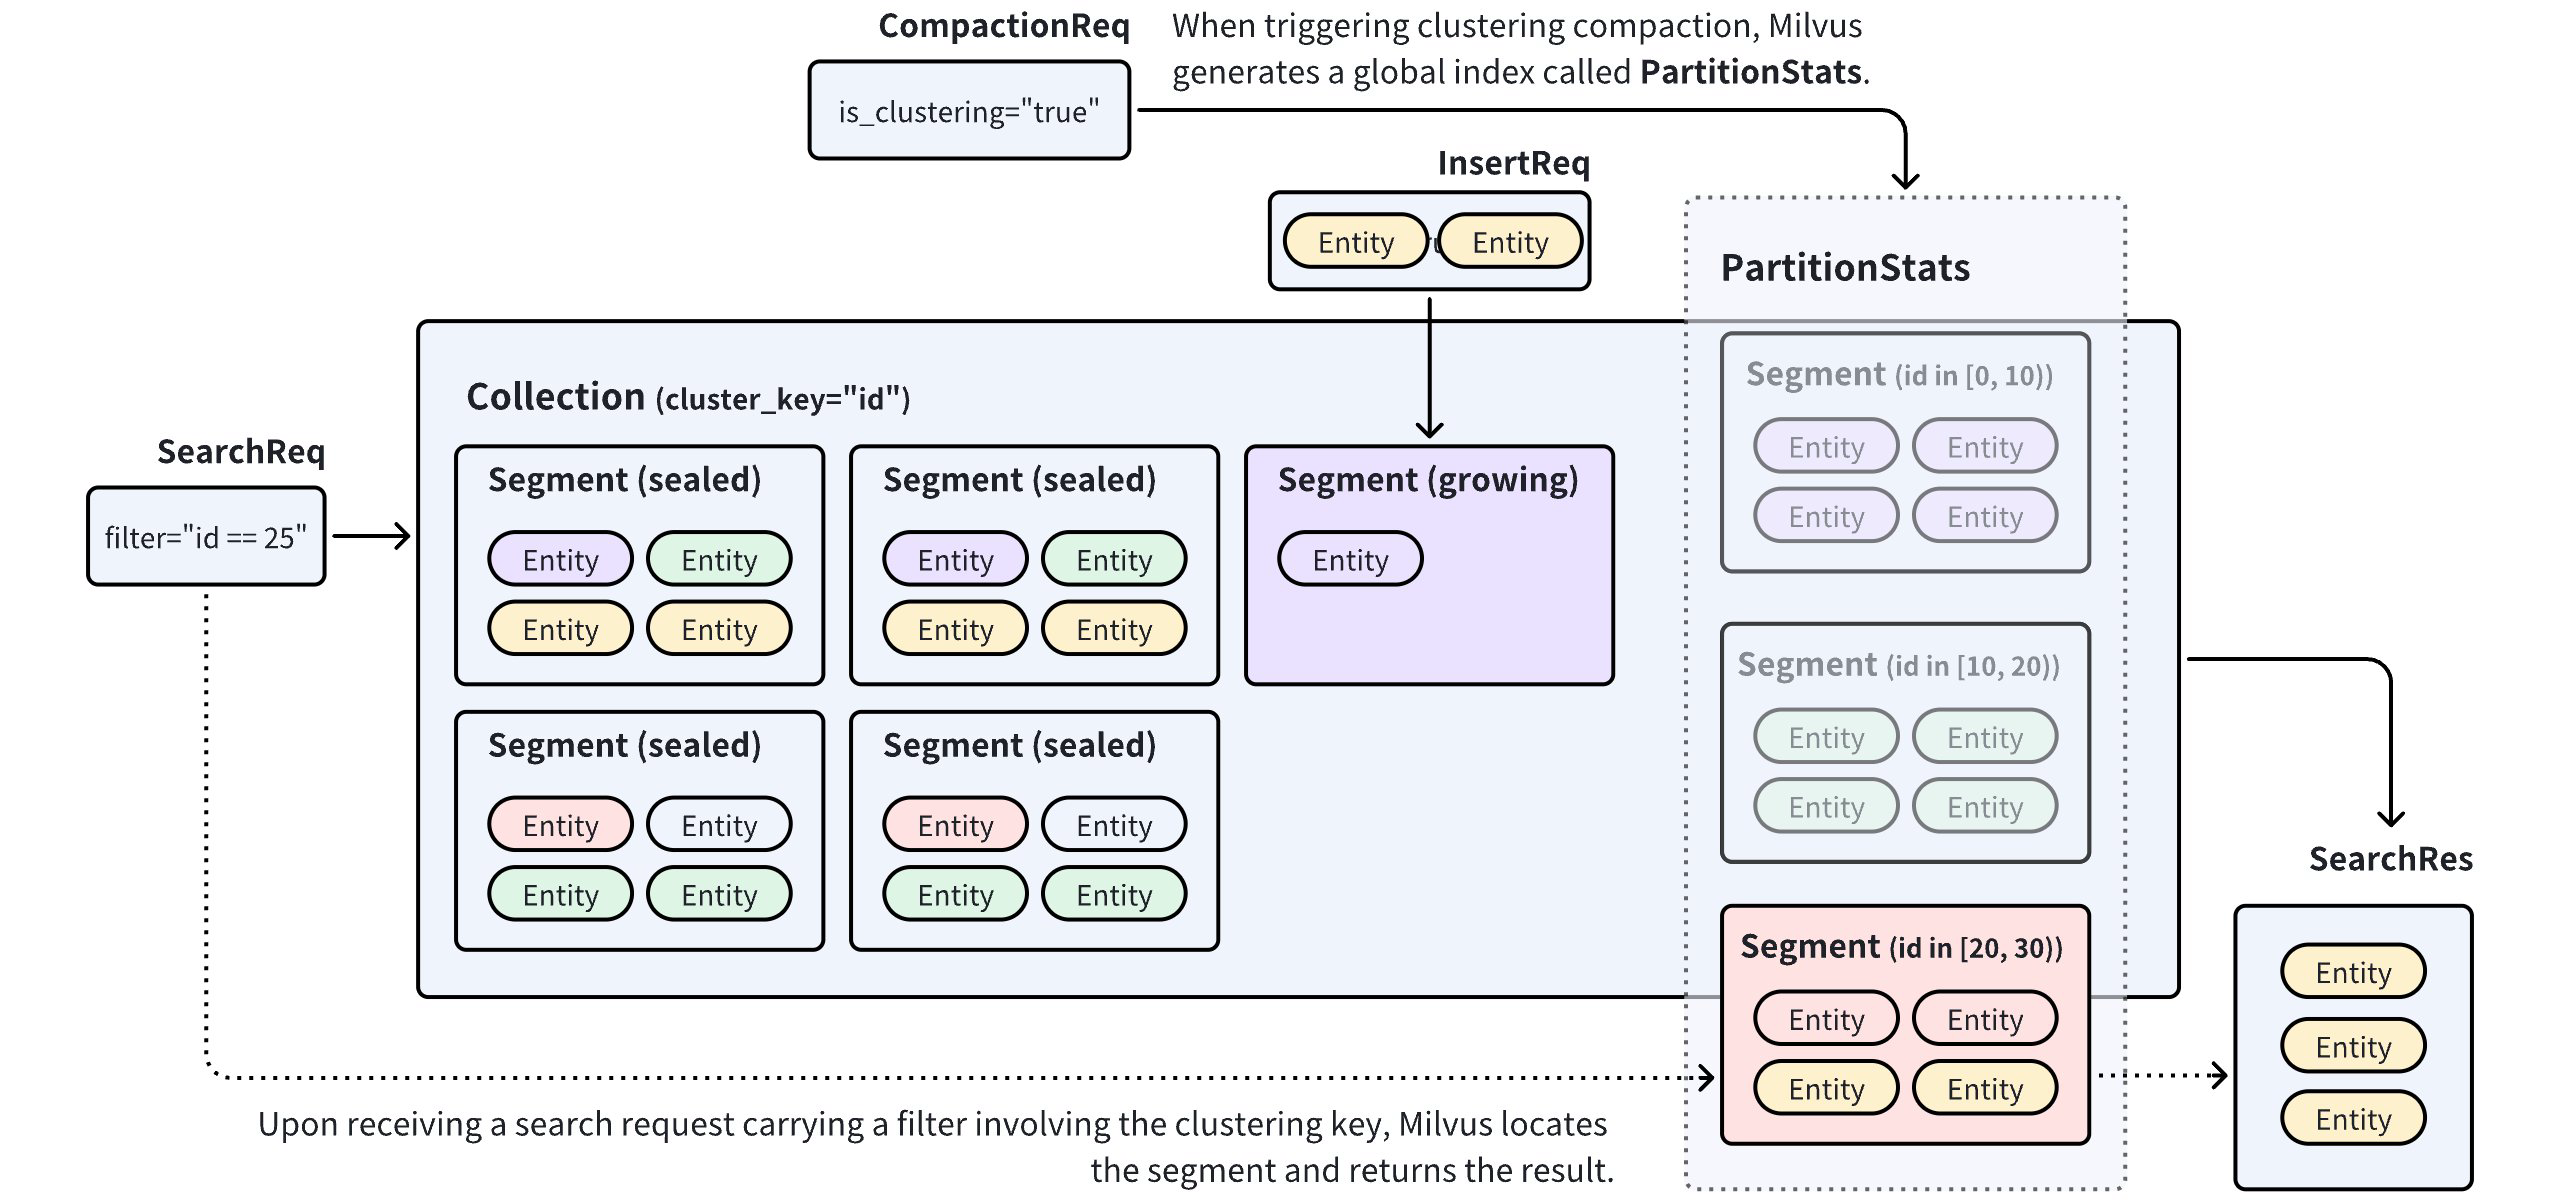 聚类压缩
聚类压缩
以PartitionStats为参考,Milvus 可以在收到带有聚类键值的搜索/查询请求时,剪切不相关的数据,并将搜索范围限制在与键值映射的段内,从而提高搜索性能。有关性能改进的详细信息,请参阅基准测试。
使用聚类压缩
Milvus 的聚类压缩功能具有高度可配置性。你可以选择手动触发,也可以将其设置为由 Milvus 每隔一段时间自动触发。要启用聚类压缩,请执行以下操作:
全局配置
您需要修改 Milvus 配置文件,如下所示。
dataCoord:
  compaction:
    clustering:
      enable: true
      autoEnable: false
      triggerInterval: 600
      minInterval: 3600
      maxInterval: 259200
      newDataSizeThreshold: 512m
      timeout: 7200

queryNode:
  enableSegmentPrune: true

datanode:
  clusteringCompaction:
    memoryBufferRatio: 0.1
    workPoolSize: 8
common:
  usePartitionKeyAsClusteringKey: true
| 配置项目
|
说明
|
默认值
| | --- | --- | --- | |
dataCoord.compaction.clustering
| |
enable
|
指定是否启用聚类压缩。如果需要为每个具有聚类密钥的 Collection 启用此功能,请将其设置为true 。
|
假
| |
autoEnable
|
指定是否启用自动触发压缩。将此设置为true 表示 Milvus 在指定的时间间隔对具有聚类键的 Collection 进行压缩。
|
假
| |
triggerInterval
|
以毫秒为单位指定 Milvus 开始聚类压缩的时间间隔。只有将autoEnable 设置为true 时才适用。
| | |
minInterval
|
以毫秒为单位指定最小间隔。仅当设置autoEnable 至true 时适用。
将其设置为大于triggerInterval 的整数有助于避免在短时间内重复压缩。
| | |
maxInterval
|
以毫秒为单位指定最大间隔。只有将autoEnable 设置为true 时才适用。
一旦 Milvus 检测到某个 Collection 的聚类压缩持续时间超过此值,就会强制进行聚类压缩。
| | |
newDataSizeThreshold
|
指定触发聚类压缩的上阈值。这仅适用于将autoEnable 设置为true 时。
一旦 Milvus 检测到 Collection 中的数据量超过此值,就会启动聚类压缩进程。
| | |
timeout
|
指定聚类压缩的超时持续时间。如果执行时间超过此值,则聚类压缩失败。
| | |
queryNode
| |
enableSegmentPrune
|
指定 Milvus 是否在收到搜索/查询请求时参考 PartitionStats 来剪切数据。将此值设为true ,这样 Milvus 就能在收到搜索/查询请求时通过引用 PartitionStats 来修剪数据。
| | |
dataNode.clusteringCompaction
| |
memoryBufferRatio
|
指定集群压缩任务的内存缓冲区比率。 当数据大小超过使用此比率计算出的分配缓冲区大小时,Milvus 会刷新数据。
| | |
workPoolSize
|
指定聚类压缩任务的工作池大小。
| | |
common
| |
usePartitionKeyAsClusteringKey
|
指定是否使用 Collection 中的 Partition Key 作为聚类密钥。将此设置为 "true",Milvus 就会把 Collection 中的 Partition Key 作为聚类密钥。
你可以在 Collection 中通过显式设置聚类密钥来覆盖此设置。
| |
要将上述更改应用到 Milvus 群集,请按照 "使用 Helm 配置 Milvus"和 "使用 Milvus Operator 配置 Milvus"中的步骤操作。
Collection 配置
要在特定 Collection 中进行聚类压缩,应从 Collection 中选择一个标量字段作为聚类键。
from pymilvus import MilvusClient, DataType

CLUSTER_ENDPOINT="http://localhost:19530"
TOKEN="root:Milvus"

client = MilvusClient(
    uri=CLUSTER_ENDPOINT,
    token=TOKEN
)

schema = MilvusClient.create_schema()
schema.add_field("id", DataType.INT64, is_primary=True, auto_id=False)
schema.add_field("key", DataType.INT64, is_clustering_key=True)
schema.add_field("var", DataType.VARCHAR, max_length=1000)
schema.add_field("vector", DataType.FLOAT_VECTOR, dim=5)

client.create_collection(
    collection_name="clustering_test",
    schema=schema
)
import io.milvus.v2.client.ConnectConfig;
import io.milvus.v2.client.MilvusClientV2;
import io.milvus.v2.common.DataType;
import io.milvus.v2.service.collection.request.AddFieldReq;
import io.milvus.v2.service.collection.request.CreateCollectionReq;

MilvusClientV2 client = new MilvusClientV2(ConnectConfig.builder()
        .uri("http://localhost:19530")
        .token("root:Milvus")
        .build());

CreateCollectionReq.CollectionSchema schema = client.createSchema();

schema.addField(AddFieldReq.builder()
        .fieldName("id")
        .dataType(DataType.Int64)
        .isPrimaryKey(true)
        .autoID(false)
        .build());

schema.addField(AddFieldReq.builder()
        .fieldName("key")
        .dataType(DataType.Int64)
        .isClusteringKey(true)
        .build());

schema.addField(AddFieldReq.builder()
        .fieldName("var")
        .dataType(DataType.VarChar)
        .maxLength(1000)
        .build());

schema.addField(AddFieldReq.builder()
        .fieldName("vector")
        .dataType(DataType.FloatVector)
        .dimension(5)
        .build());

CreateCollectionReq requestCreate = CreateCollectionReq.builder()
        .collectionName("clustering_test")
        .collectionSchema(schema)
        .build();
client.createCollection(requestCreate);
// go
import { MilvusClient, DataType } from '@zilliz/milvus2-sdk-node';

const CLUSTER_ENDPOINT = 'http://localhost:19530';
const TOKEN = 'root:Milvus';
const client = new MilvusClient({
  address: CLUSTER_ENDPOINT,
  token: TOKEN,
});
const schema = [
    {
      name: 'id',
      type: DataType.Int64,
      is_primary_key: true,
      autoID: false,
    },
    {
      name: 'key',
      type: DataType.Int64,
      is_clustering_key: true,
    },
    {
      name: 'var',
      type: DataType.VarChar,
      max_length: 1000,
      is_primary_key: false,
    },
    {
      name: 'vector',
      type: DataType.FloatVector,
      dim: 5,
    },
  ];

  await client.createCollection({
    collection_name: 'clustering_test',
    schema: schema,
  });
# restful
说明 您可以使用以下数据类型的标量字段作为聚类键:
Int8,Int16,Int32,Int64,Float,Double和VarChar。
触发聚类压缩
如果启用了自动聚类压缩,Milvus 会在指定的时间间隔自动触发压缩。或者,您也可以按如下方式手动触发压缩:
# trigger a manual compaction
job_id = client.compact(
    collection_name="clustering_test",
    is_clustering=True
)

# get the compaction state
client.get_compaction_state(
    job_id=job_id,
)
import io.milvus.v2.service.utility.request.CompactReq;
import io.milvus.v2.service.utility.request.GetCompactionStateReq;
import io.milvus.v2.service.utility.response.CompactResp;
import io.milvus.v2.service.utility.response.GetCompactionStateResp;

CompactResp compactResp = client.compact(CompactReq.builder()
        .collectionName("clustering_test")
        .isClustering(true)
        .build());

GetCompactionStateResp stateResp = client.getCompactionState(GetCompactionStateReq.builder()
        .compactionID(compactResp.getCompactionID())
        .build());

System.out.println(stateResp.getState());
// go
// trigger a manual compaction
const {compactionID} = await client.compact({
    collection_name: "clustering_test",
    is_clustering: true
});

// get the compaction state
await client.getCompactionState({
    compactionID: compactionID,
});
# restful
基准测试
数据量和查询模式共同决定了聚类压缩所能带来的性能提升。一项内部基准测试表明,聚类压缩最多可将每秒查询次数(QPS)提高 25 倍。
该基准测试是在一个包含来自 2000 万个 768 维 LAION 数据集的实体的 Collection 上进行的,该数据集的key 字段被指定为聚类密钥。在 Collection 中触发聚类压缩后,会发送并发搜索,直到 CPU 使用率达到高水位。
| 搜索过滤器
|
剪切率
|
延迟
|
请求/秒
| | --- | --- | --- | --- | |
平均值
|
最小值
|
最大值
|
中位数
|
TP99
| |
不适用
|
0%
|
1685
|
672
|
2294
|
1710
|
2291
|
17.75
| |
密钥>200 和密钥 < 800
|
40.2%
|
1045
|
47
|
1828
|
1085
|
1617
|
28.38
| |
键>200 和键 < 600
|
59.8%
|
829
|
45
|
1483
|
882
|
1303
|
35.78
| |
键>200 和键 < 400
|
79.5%
|
550
|
100
|
985
|
584
|
898
|
54.00
| |
键==1000
|
99%
|
68
|
24
|
1273
|
70
|
246
|
431.41
|
随着搜索筛选器中搜索范围的缩小,剪切率也随之增加。这意味着在搜索过程中会跳过更多的实体。比较第一行和最后一行的统计数据,可以发现不进行聚类压缩的搜索需要扫描整个 Collection。另一方面,使用特定键进行聚类压缩的搜索可以实现高达 25 倍的改进。
最佳实践
以下是一些有效使用聚类压缩的提示:
-
为数据量较大的 Collection 启用此功能。
Collection 中的数据量越大,搜索性能就越高。对于超过 100 万个实体的 Collection,启用此功能是一个不错的选择。
-
选择合适的聚类关键字。
可以使用通常用作筛选条件的标量字段作为聚类关键字。对于保存多个租户数据的 Collection,可以利用区分一个租户和另一个租户的字段作为聚类密钥。
-
使用 Partition Key 作为聚类密钥。
如果你想为 Milvus 实例中的所有 Collection 启用此功能,或者在使用 Partition Key 的大型 Collection 中仍面临性能问题,可以将
common.usePartitionKeyAsClusteringKey设置为true。通过这样做,当你选择 Collection 中的标量字段作为 Partition Key 时,你将拥有一个聚类键和一个 Partition Key。请注意,此设置不会阻止您选择另一个标量字段作为聚类键。明确指定的聚类键始终优先。